Unreal Engine: Importing PBR Textures and ORM Correctly
Unreal Engine reads metallic, roughness, and AO from a single ORM texture (red AO, green roughness, blue metallic) — exactly the channel order our ARM file already uses — and expects normal maps in DirectX convention, so our OpenGL files need Flip Green Channel on import.
- Version
- Unreal Engine 5.7 (current full release)
- Import framework
- Interchange, the current import path for FBX and glTF
- Our ARM file
- same channel order as Unreal's ORM (R AO, G roughness, B metallic)
- Time needed
- about 20 minutes
ORM instead of separate textures
Unreal Engine builds its standard material workflow around one packed texture: the ORM texture (Occlusion, Roughness, Metallic). Instead of loading three separate grayscale images, a material reads one RGB file and splits the channels across three inputs. That's good news if you're working with FS Modworks assets, because our _arm file already follows this exact layout: red ambient occlusion, green roughness, blue metallic. Where other texture sets need reordering first, ours drops straight into the ORM slot.
The answer comes down to a convention that differs between 3D applications, more on that in a moment. The rest of this guide walks through import, compression, a basic material graph, and the one case where our models pick up real displacement.
Every one of our texture sets (Cracked Concrete 01, Oak Planks 01, Rusty Corrugated Metal 01, Cobblestone 01, and Corrugated Metal 01) ships the same six maps at 2K, 4K, and 8K. For Unreal, three files matter most: _diff for base color, _arm for the ORM slot, and _nor_gl for the normal map. _rough, _ao, and _disp also come as standalone files, in case you'd rather build a custom material setup than use the packed ARM file, say to fine-tune roughness with a curve node afterward.
Step 1: Import textures and set compression
When you import a texture into Unreal, the texture asset's Details panel exposes a Compression Settings dropdown. Per Epic's documentation, these are presets rather than a manual per-channel setup:
| File | Compression Setting | sRGB |
|---|---|---|
_diff (diffuse/basecolor) |
Default | On |
_nor_gl (normal map) |
Normalmap | Off |
_arm as ORM, _rough, _ao |
Masks | Off |
Default compresses with sRGB support for color textures. Normalmap carries the full name "Normalmap (DXT5, BC5 on DX11)" in the engine and is tuned for directional data. Masks is labeled "Masks (no sRGB)" and suits any texture used as an input mask rather than color. That covers our ORM/ARM file, and the standalone roughness and AO files if you'd rather use those separately.
The difference between the two presets comes down to the compressed format itself: per Epic's documentation, Normalmap uses BC5 internally, a format that stores only two channels at high precision, exactly what a normal map needs since it only relies on red and green for direction data anyway. Masks instead uses DXT1 or DXT5 with the full channel count, so ambient occlusion, roughness, and metallic all survive side by side in one texture without compression corrupting one of the channels. Pick Default for an ORM texture by mistake, and you don't just get the wrong gamma correction from sRGB being on, you also end up with a compression format that was never meant for mask data.
Why ORM uses less memory than separate textures
The advantage of the ORM format shows up most clearly on materials covering a lot of surface area, a whole row of buildings using our Corrugated Metal or Cobblestone texture, for instance. Instead of loading three separate grayscale textures (one for ambient occlusion, one for roughness, one for metallic), the GPU reads a single RGB file and pulls all three values from one texture sample. That saves both disk space and rendering bandwidth, since fewer texture fetches are needed per pixel.
It's especially noticeable with our Rusty Corrugated Metal 01 and Corrugated Metal 01, both of which carry a visible metallic component in their _arm file: a material built from three separate AO, roughness, and metallic textures needs three times as many texture samples as one using our packed ARM file in the ORM slot, for an identical visual result.
Step 2: Normal maps and the green channel
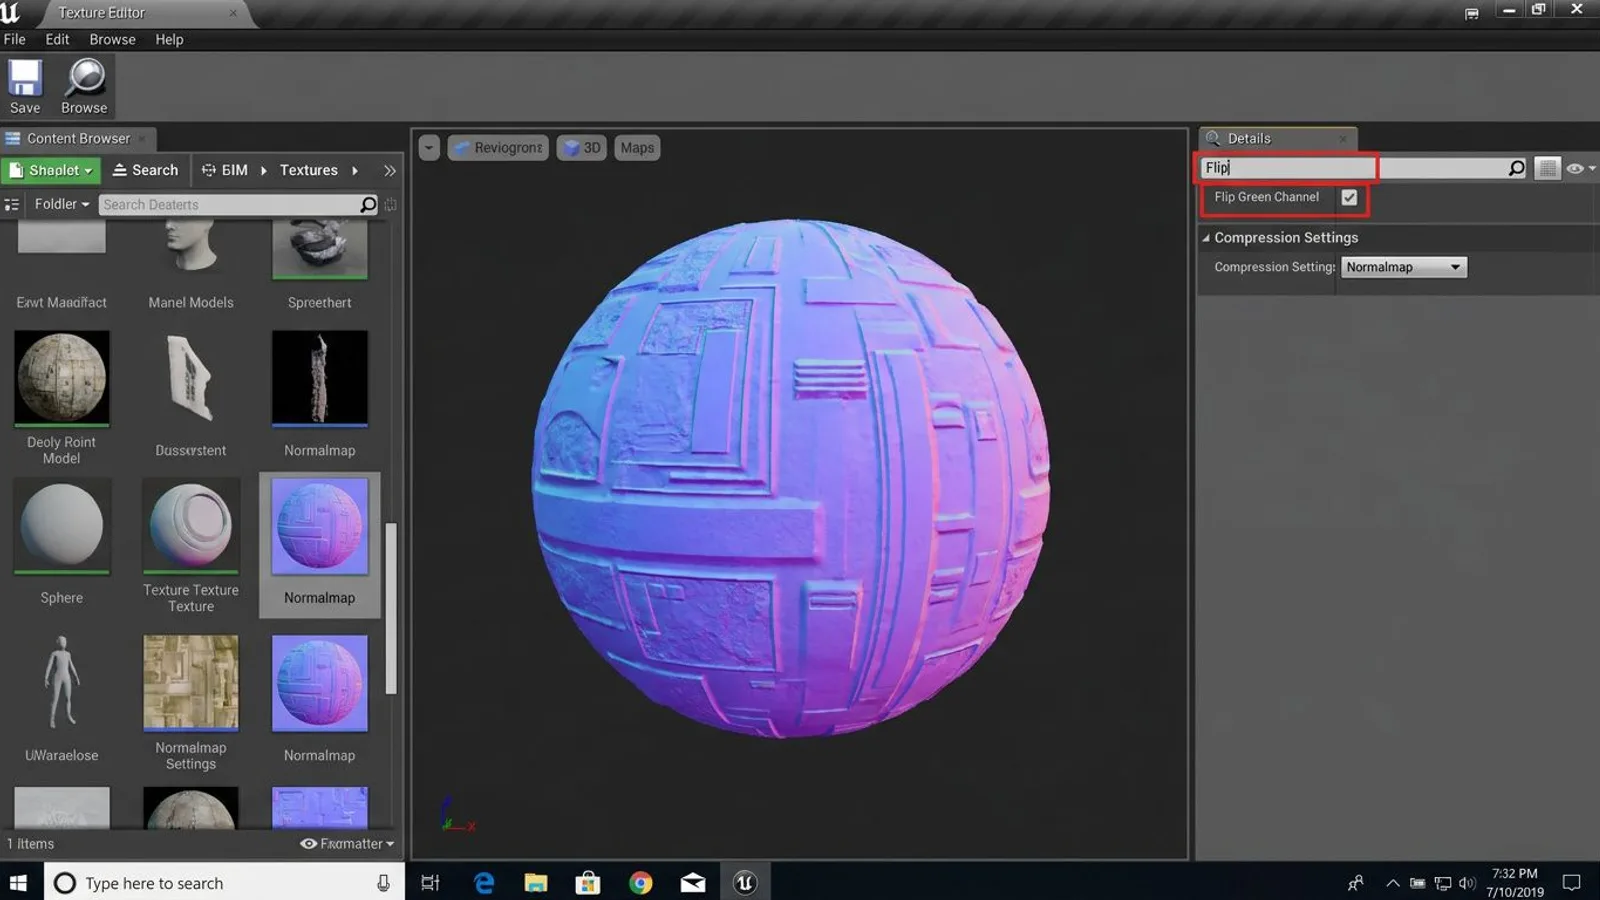
This is where most of our customers trip up first. 3D applications author normal maps in one of two conventions that differ only in the sign of the green channel: OpenGL and DirectX. Our _nor_gl files are rendered in OpenGL convention, as the filename says. Unreal Engine works in the DirectX convention (inverted green channel) instead — which is why the texture editor has a Flip Green Channel option that, per Epic's documentation, inverts a texture's green channel and is explicitly meant for normal maps.
The mismatch doesn't show up as an error. It shows up as broken lighting. Recessed detail looks raised, edges catch light from the wrong direction. The fix is one checkbox in the texture editor: Flip Green Channel. Enable it for our _nor_gl file and Unreal inverts the green channel at sample time, no need to touch the source file. For more on how normal maps work in general and what the two conventions look like side by side, see the normal map guide.
 AI-generated
Step 3: Basic material setup
A simple material for one of our textures needs only a few nodes:
- Texture Sample with
_diff→ Base Color - Texture Sample with the ORM file (our
_arm) → split via a channel node (a Component Mask, for example) into Ambient Occlusion (red), Roughness (green), and Metallic (blue) - Texture Sample with
_nor_gl, Flip Green Channel enabled → Normal
The channel-split node pulls three values out of one texture sample, so Unreal only loads the file once instead of three times. That's the entire point of the ORM format.
Material instances for multiple surfaces
Once the same texture ends up on several objects of different sizes, it's worth building a Material Instance instead of using the base material directly everywhere. Build the node setup from step 3 once as a parent material, turn UTiling, VTiling, and possibly normal map intensity into parameters, then create one instance per surface. The payoff: a material instance only changes parameter values, so Unreal never has to recompile the shader. With our textures spread across a few dozen surfaces, that difference is noticeable in day-to-day editor work.
Step 4: Control tiling through TexCoord
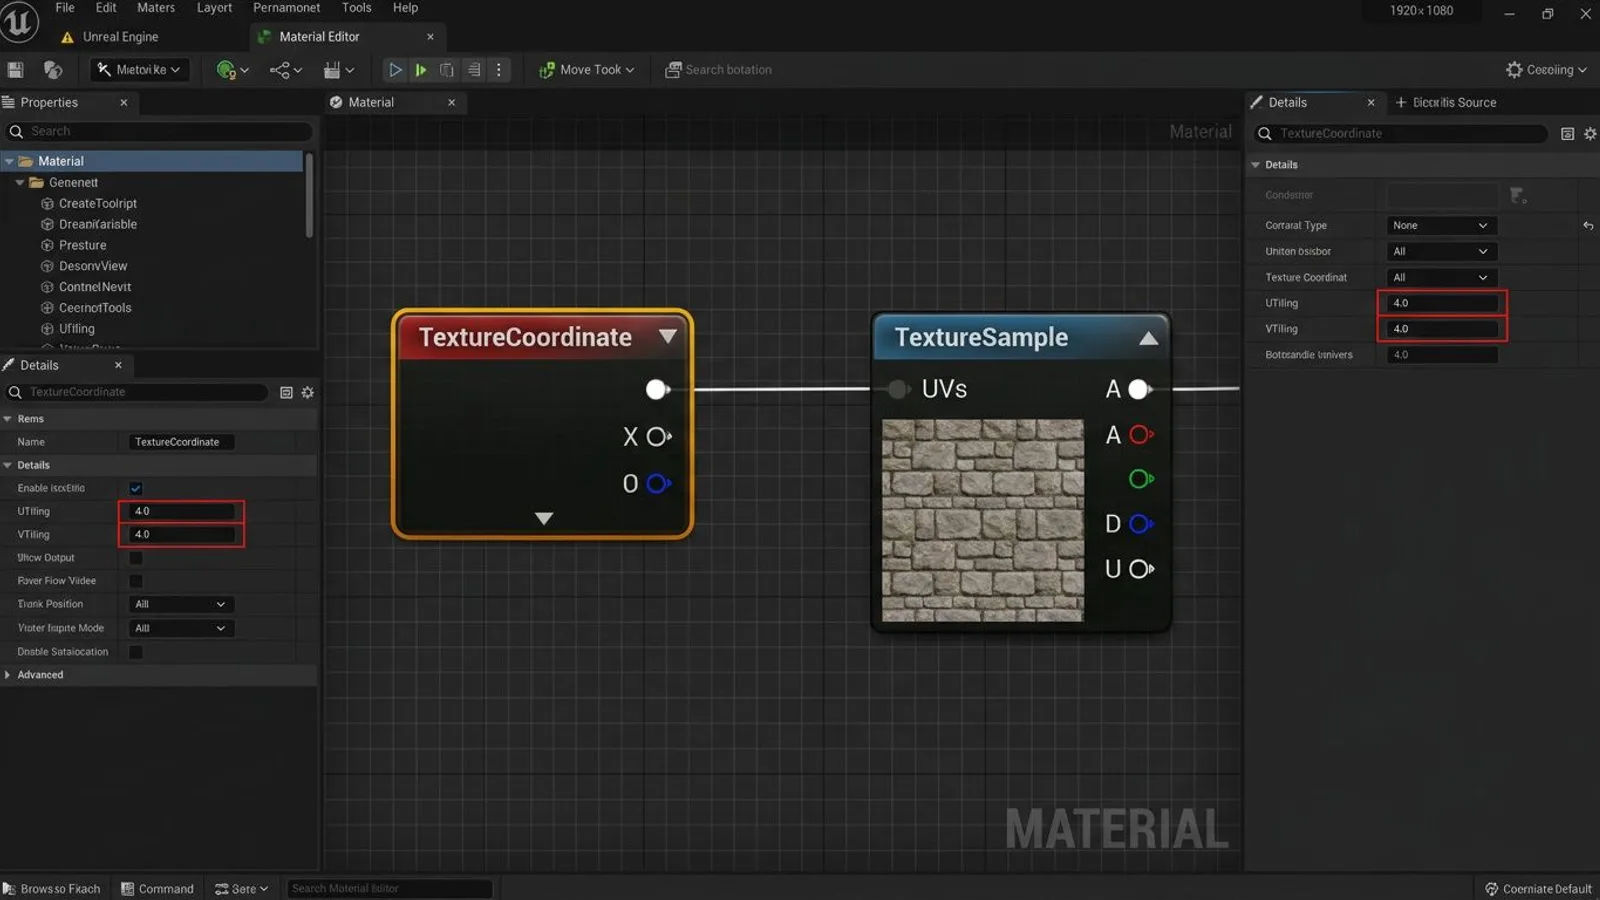
To get our textures showing at the correct tile size on a surface, you need a TextureCoordinate node (usually labeled "TexCoord[0]" in the material graph) between the mesh's UV data and the texture sample nodes. Per Epic's documentation, this node exposes UTiling and VTiling inputs that control the repeat rate independently of the mesh. A higher tiling value repeats the texture more often across the same surface; a lower one stretches it.
 AI-generated
In practice, you'd turn UTiling and VTiling into Scalar Parameters so they can be adjusted per material instance without recompiling, useful when the same texture ends up on surfaces of very different sizes.
Step 5: Displacement with Nanite Tessellation
Our _disp file is a height map. Actual displacement, meaning added geometry rather than just simulated depth, comes from Nanite Tessellation in current UE5 versions. Per Epic's documentation, it's dynamic, programmable displacement that tessellates a Nanite mesh at runtime based on a displacement map or a procedural material.
It requires a Nanite-enabled mesh. The feature isn't switched on in the material itself but through project settings: per Epic's documentation, r.Nanite.AllowTessellation=1 belongs in ConsoleVariables.ini or a project configuration file (it can't be toggled at runtime), and r.Nanite.Tessellation=1 turns the feature on. Only then can a tessellation option be enabled on the material, which exposes a displacement input for our _disp texture. The feature is still labeled experimental.
Step 6: Importing models
Our 3D model packages ship as FBX and as glTF. Both formats import through the Interchange framework, Unreal's current import and export system. Per Epic's documentation, it's format-agnostic, asynchronous, and replaces the older, format-specific FBX importer. On import, Unreal shows a pipeline dialog where texture and material options can be adjusted before the first asset even lands in the project.
The import dialog splits into two areas, per the documentation: Translator Settings read the source file and parse its content into an internal intermediate format, while Pipeline Settings decide how that content becomes Unreal assets: whether materials get created automatically, textures get auto-bound, and collision data carries over. Our FBX packages usually need only a single pipeline; glTF imports show several pipelines stacked depending on the file's contents, for example separate ones for meshes and materials. Three options control the view, per the documentation: Basic Layout trims the option list down to the essentials, Filter on Contents only shows options relevant to the file actually being imported, and Choose Pipeline Stack selects which pipeline stack handles the import.
More on our formats and when to use which is covered in a separate overview of FBX, glTF, and the other formats we ship with every 3D model package.
If you also want to use the same texture in LS25 (Farming Simulator 25), Unreal Engine isn't the tool for that step. Import there goes through the GIANTS Editor, with its own DDS format and its own specular map layout, not ORM textures. If you maintain both paths in parallel, keep the two texture variants separate: an ORM file for Unreal projects, a DDS conversion for LS25 mods, each built from the same _arm or _specular source.
If a project also runs through Unity, the comparison is worth making: both engines expect channel packing, just in a different order. The ORM/ARM guide puts both standards side by side, and the displacement map guide goes deeper into height maps across engines.
Common problems
| Problem | Cause | Fix |
|---|---|---|
| Lighting looks inverted, recessed areas look raised | Normal map in OpenGL convention imported without Flip Green Channel | Enable Flip Green Channel in the texture settings |
| ORM texture gives wrong values in the material | Compression Setting left on Default instead of Masks, sRGB still on | Set Compression Setting to Masks, disable sRGB |
| No displacement input on the material | Nanite Tessellation not enabled through project settings | Set r.Nanite.AllowTessellation=1 (in config) and r.Nanite.Tessellation=1, then enable tessellation on the material |
| Texture repeats distorted or at the wrong scale | Missing TexCoord node, or UTiling/VTiling not set | Add a TextureCoordinate node, set UTiling/VTiling to match the tile size |
| FBX import fails with a metadata error | Legacy FBX importer active instead of Interchange | Run the import through the Interchange framework |
Frequently asked questions
Can I use our ARM texture directly as an ORM texture?
Yes. Our ARM file stores red AO, green roughness, blue metallic — exactly the order Unreal expects for an ORM texture. No repacking needed.
Why does our normal map look inverted in Unreal?
Our files use the OpenGL convention, and Unreal expects DirectX. Enable Flip Green Channel in the texture settings and the lighting reads correctly.
What compression settings do our textures need?
Diffuse textures use Default (with sRGB), the normal map uses Normalmap (no sRGB), and the ORM/ARM file plus separate roughness and AO files use Masks (also no sRGB).
Does displacement work with our height maps in UE5?
Only through Nanite Tessellation, which is still experimental. It needs a Nanite mesh, gets switched on through project settings (the console variables r.Nanite.AllowTessellation and r.Nanite.Tessellation), and then reads height values from our _disp file.