Displacement in Blender: Bump vs. Real Displacement, and the Displace Modifier
Real displacement in Blender needs three things together: a Displacement node on the Material Output, the material setting Displacement Only or Displacement and Bump, and in Cycles enough subdivision on the geometry, otherwise you just get a bump illusion.
- Version
- Blender 5.2 LTS (currently 5.2.2, as of September 2026)
- Render engines
- Both Cycles and EEVEE support real displacement, each with its own rules
- Our map
- `_disp`, 16-bit PNG, Non-Color, Midlevel 0.5
- Displace modifier
- Renderer-independent alternative, changes the mesh permanently
Our _disp maps carry real height information, not a replacement for the normal map but a companion to it, so deep grooves and edges also show up at an object's silhouette. For that to actually happen in Blender instead of just looking like bump mapping, three things need to line up: the node, the material setting, and the geometry itself. For how displacement fits alongside Diffuse, Roughness, and ARM in a full material, see our Blender basics guide.
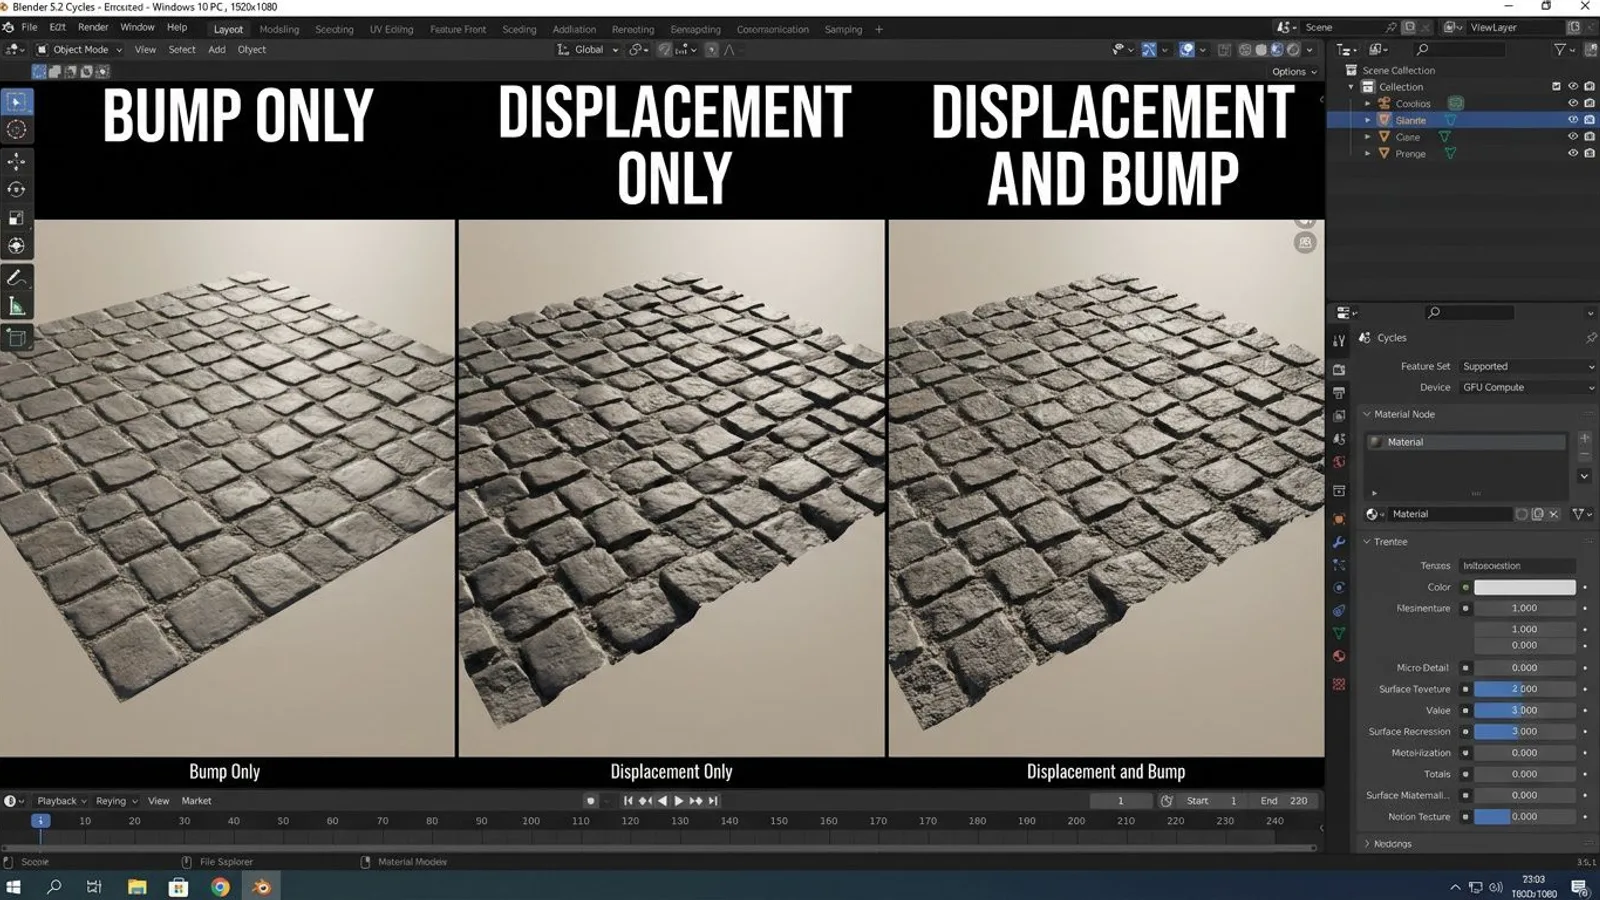
Bump vs. real displacement
Without any further setup, Blender only uses bump mapping for anything plugged into the Displacement input on the Material Output. The shader computes a modified surface normal at render time, as if the surface were uneven, but the mesh itself never actually changes. That's cheap and fast, but it has two downsides: the object's edge silhouette stays perfectly smooth, and there's no real self-shadowing from the faked bumps.
Real displacement, on the other hand, actually moves the vertices along their normals before rendering happens. That costs more memory and render time, since Blender needs finely enough resolved geometry for it to work, but it gives you a correct silhouette and real shadows inside the recesses. For what a displacement map is as a texture type, independent of Blender, see our general displacement map guide.
 AI-generated
The Displacement node
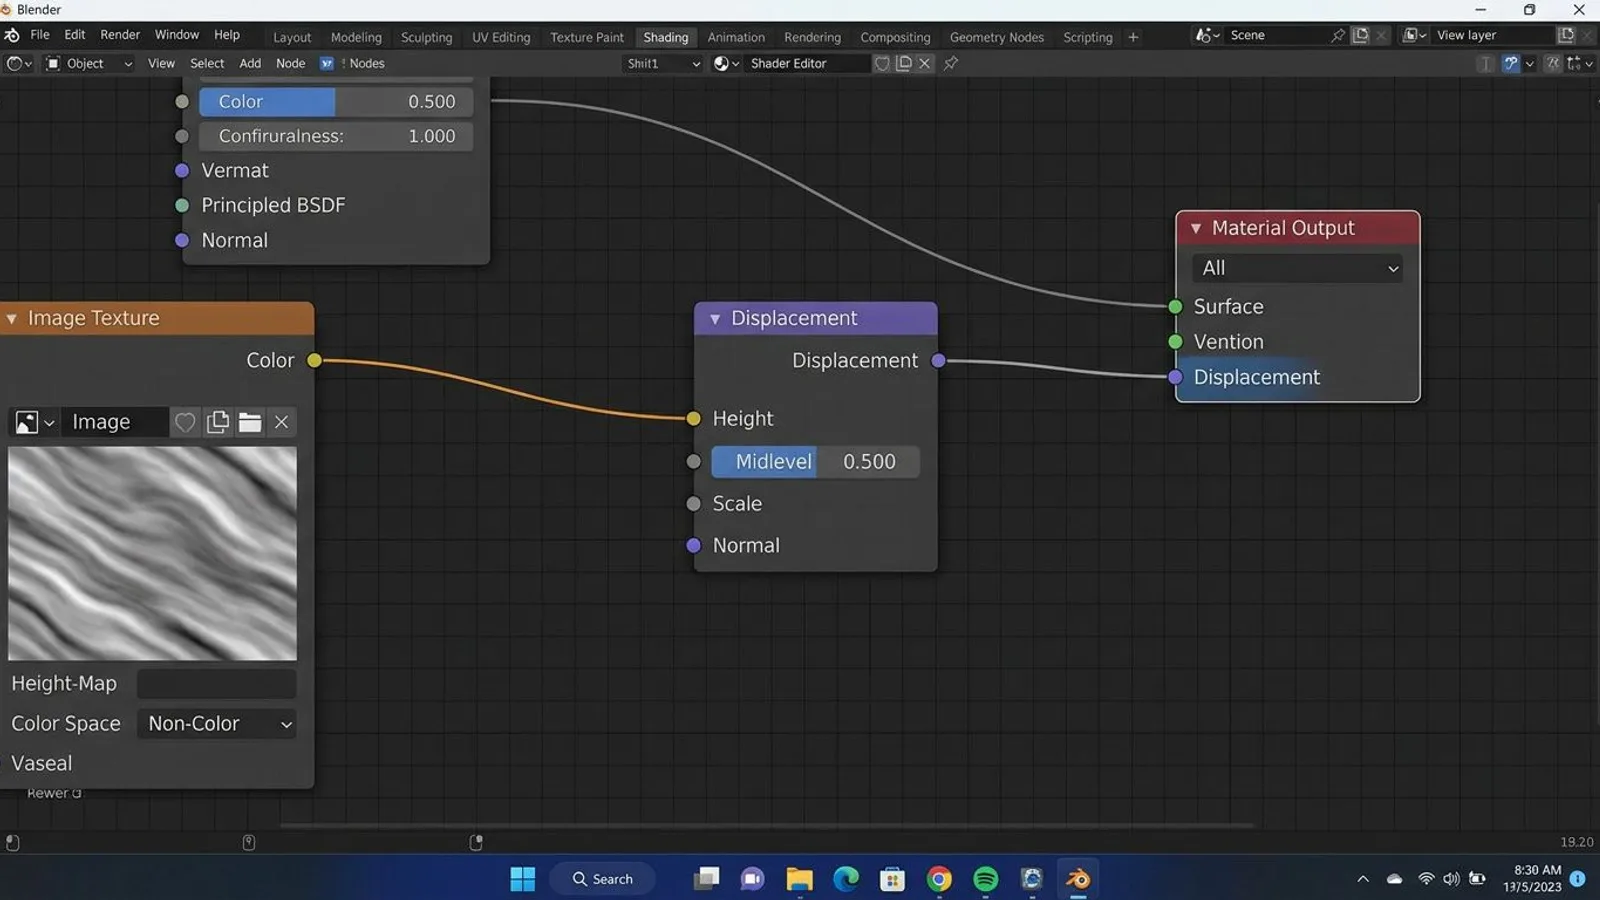
Add an Image Texture node with our _disp file, color space Non-Color, exactly like Roughness or the normal map. Add a Displacement node after it (Add, Vector, Displacement) and connect its output to the Displacement input on the Material Output node, not on the Principled BSDF, those are two separate inputs on the same node.
The Displacement node has four inputs: Height takes the texture, Midlevel sets which gray value means no displacement at all, defaulting to 0.5, Scale controls the strength, and Normal is an optional input for a custom normal direction that you'll usually leave untouched. Our 16-bit PNGs are calibrated exactly to Midlevel 0.5, mid-gray means no displacement, brighter areas push out, darker areas sink in.
The Space property on the node switches between Object Space and World Space. Object Space scales the displacement along with the object's size, World Space ignores object scaling. For most cases where you scale your object normally in Blender, Object Space is the right choice.
One thing worth checking: real displacement only shows up in the 3D viewport in Rendered shading mode, since Blender only computes it during the actual render. In Solid or Material Preview mode, the geometry stays visibly unchanged even when the node and material setting are already set up correctly, that's not a bug, just a different display level.
 AI-generated
Switching the material setting (Cycles)
Even with a correctly wired Displacement node, you still just get bump mapping until the material setting is switched. Open the Settings section in the Material Properties tab, where with Cycles as the active engine you'll find the Displacement property with three options.
| Option | Effect | When it makes sense |
|---|---|---|
| Bump Only | Only a modified normal, geometry stays unchanged | Quick preview, very fine detail, limited memory |
| Displacement Only | Vertices are actually moved, highest quality | Visible edges, silhouette, sufficiently fine subdivision already in place |
| Displacement and Bump | Coarse shape from real displacement, fine detail added via bump | Good balance of quality and render time on coarser subdivision |
For our textures, Displacement and Bump is the right choice most of the time: the coarse structure, say the grooves on Cracked Concrete 01 or the boards on Oak Planks 01, gets real geometry, while finer grain stays in via the bump component, without forcing you to subdivide the mesh more than necessary. Displacement Only mainly pays off for close-ups, where the camera gets near enough that even the last bit of silhouette detail would be noticeable, for most floor and wall surfaces in a normal scene the extra effort isn't needed.
Providing enough geometry
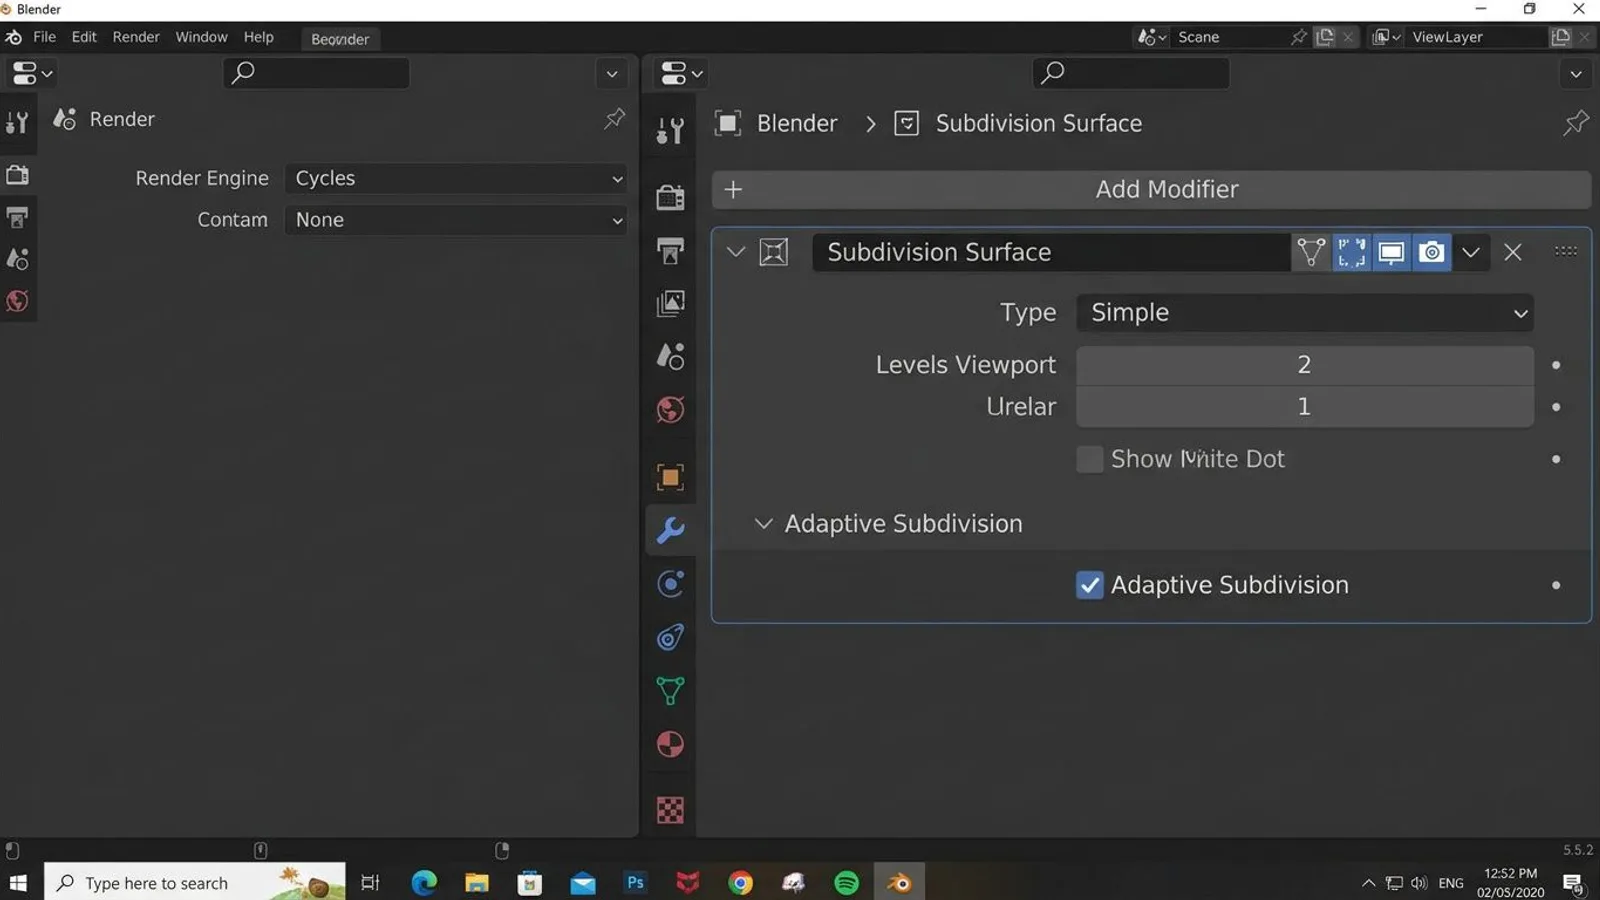
Displacement can only be as fine as the geometry allows. On a single face with four corner points, Displacement Only produces nothing visible in the worst case, because there's nothing between those four corners to displace. Add a Subdivision Surface modifier, in Simple mode if you don't want additional smoothing and just need more vertices for the displacement to work with. Two to four subdivision levels are a reasonable starting point for most wall and floor surfaces, more costs more memory and render time.
Simple mode instead of Catmull-Clark is a deliberate choice here: Catmull-Clark also smooths the surface before the displacement map even gets a say, which changes the base shape of your object in a way you usually don't want on a flat wall or floor. Simple only subdivides without smoothing, leaving the displacement map full control over the actual height profile.
For even finer results without loading down the viewport preview, Cycles also offers adaptive subdivision, only available in Cycles per Blender's own documentation. As of Blender 5.0 this is no longer an experimental feature: you enable the Adaptive Subdivision property directly on the Subdivision Surface modifier once Cycles is the active render engine, with no Feature Set switch needed beforehand. Blender then subdivides the surface only at render time, based on distance to the camera, saving memory compared to a fixed high subdivision level.
 AI-generated
What about EEVEE?
EEVEE has its own Displacement property in the same Settings section of the Material Properties, but works differently behind the scenes than Cycles. Bump Only works as expected, Displacement and Bump actually moves vertices, but there's no working Displacement Only option, selecting it falls back to Displacement and Bump automatically. EEVEE computes the displacement per sample at render time, without needing you to subdivide the geometry as heavily as Cycles requires, but it caps the result with a Max Distance value, how far a vertex is allowed to move at most. Too low a value visibly clips strong swings in the displacement map, too high a value can cause dropouts at the edge of the frame when displaced geometry falls outside camera culling.
The Displace modifier as an alternative
If you need the displacement baked into the mesh itself as real geometry regardless of which render engine is active, for example before exporting to another application, the Displace modifier is the more robust choice. It sits in the modifier stack, not in the material, and moves vertices directly based on a texture's brightness values, independent of whether Cycles or EEVEE happens to be active.
Add the modifier (Add Modifier, Deform, Displace), pick the _disp file under Texture from a newly created texture, set Direction to Normal so it displaces along the vertex normals, and adjust Midlevel and Strength. The same rule applies: 0.5 as Midlevel matches our maps, and the underlying formula is simple, the offset for each vertex is the texture value minus Midlevel, multiplied by Strength.
The difference from material displacement: the Displace modifier changes the mesh permanently and independent of the renderer, you see the displacement in the viewport in Object Mode the same way as in any render engine, but it also needs sufficiently subdivided geometry underneath, usually combined with a Subdivision Surface modifier placed before the Displace modifier in the stack order.
For a model headed into an FS25 mod through the GIANTS Engine, the Displace modifier is usually the better route: you apply it before exporting, and the displacement is baked permanently into the mesh from then on, regardless of whether the target application even understands material displacement. Our GIANTS texture package doesn't carry height information as its own channel anyway, that level of detail lives in the normal map instead, so real displacement pays off for FS25 mainly for coarse, actually modeled shape rather than the fine surface structure of a texture.
Common problems
| Problem | Cause | Fix |
|---|---|---|
| Displacement node is connected, but nothing visibly moves | The material's Displacement setting is still on Bump Only | Switch it to Displacement Only or Displacement and Bump under Settings in the Material Properties tab |
| Surface barely displaces despite the correct setting | Not enough geometry, the surface has too few vertices to move | Add a Subdivision Surface modifier or raise its levels, add adaptive subdivision in Cycles if needed |
| Displacement looks way too strong or completely distorted | The displacement map's color space is sRGB instead of Non-Color, or Scale is too high | Set the color space to Non-Color and lower the Scale value on the Displacement node step by step |
| The Displace modifier shows no effect at all | Direction is set to a single axis instead of Normal, or no texture is assigned in the Texture field | Set Direction to Normal and assign the correct image texture in the Texture field |
| Adaptive Subdivision option is missing on the modifier | The property is Cycles-only per Blender's documentation | Switch the render engine to Cycles in the Render tab, then the option shows up on the Subdivision Surface modifier |
Frequently asked questions
What's the difference between bump and real displacement?
Bump only fakes structure visually with a modified surface normal, the geometry itself stays exactly the same. Real displacement actually moves the vertices, so the object's silhouette changes too.
Why don't I see real displacement in Cycles even though I connected a Displacement node?
The material's Displacement setting defaults to Bump Only. Switch it in the Material Properties panel under Settings to Displacement Only or Displacement and Bump.
How much subdivision do I need for displacement?
Enough that the finest details in the displacement map are still resolved by individual vertices. A Subdivision Surface modifier in Simple mode with a few levels is the usual starting point, with adaptive subdivision in Cycles on top if needed.
Does displacement work in EEVEE too?
Yes, EEVEE has its own Displacement setting, though without a working Displacement Only option, which falls back to Displacement and Bump automatically. EEVEE doesn't need as much subdivision as Cycles, but caps the displacement with a Max Distance value.
Why is Midlevel 0.5 on your displacement map?
0.5 is the neutral middle value with no displacement on a 16-bit PNG. Values below push the surface inward, values above push it outward, our maps are calibrated exactly for that.