Displacement Map: Real Geometry Instead of a Lighting Trick
A displacement map moves the actual position of vertices based on height values, which only works with a sufficiently subdivided mesh. Our own _disp maps ship as 16-bit PNG so the relief doesn't show visible stepping.
- In short
- Only real displacement moves geometry; bump and parallax only fake depth visually
- Our textures
- _disp = height map, 16-bit PNG
- Neutral value
- Midlevel is usually 0.5 — values above raise the surface, values below lower it
- Requires
- Enough mesh subdivision, or the relief looks faceted
Height, bump, parallax, and real displacement compared
Whether you're prepping textures for FS25 modding in Blender or working in a different 3D application entirely, it usually starts with the same file: a height map, a plain grayscale image where bright areas mean "high" and dark areas mean "low." That map by itself isn't a technique yet, just raw data. What it becomes depends entirely on how it gets used.
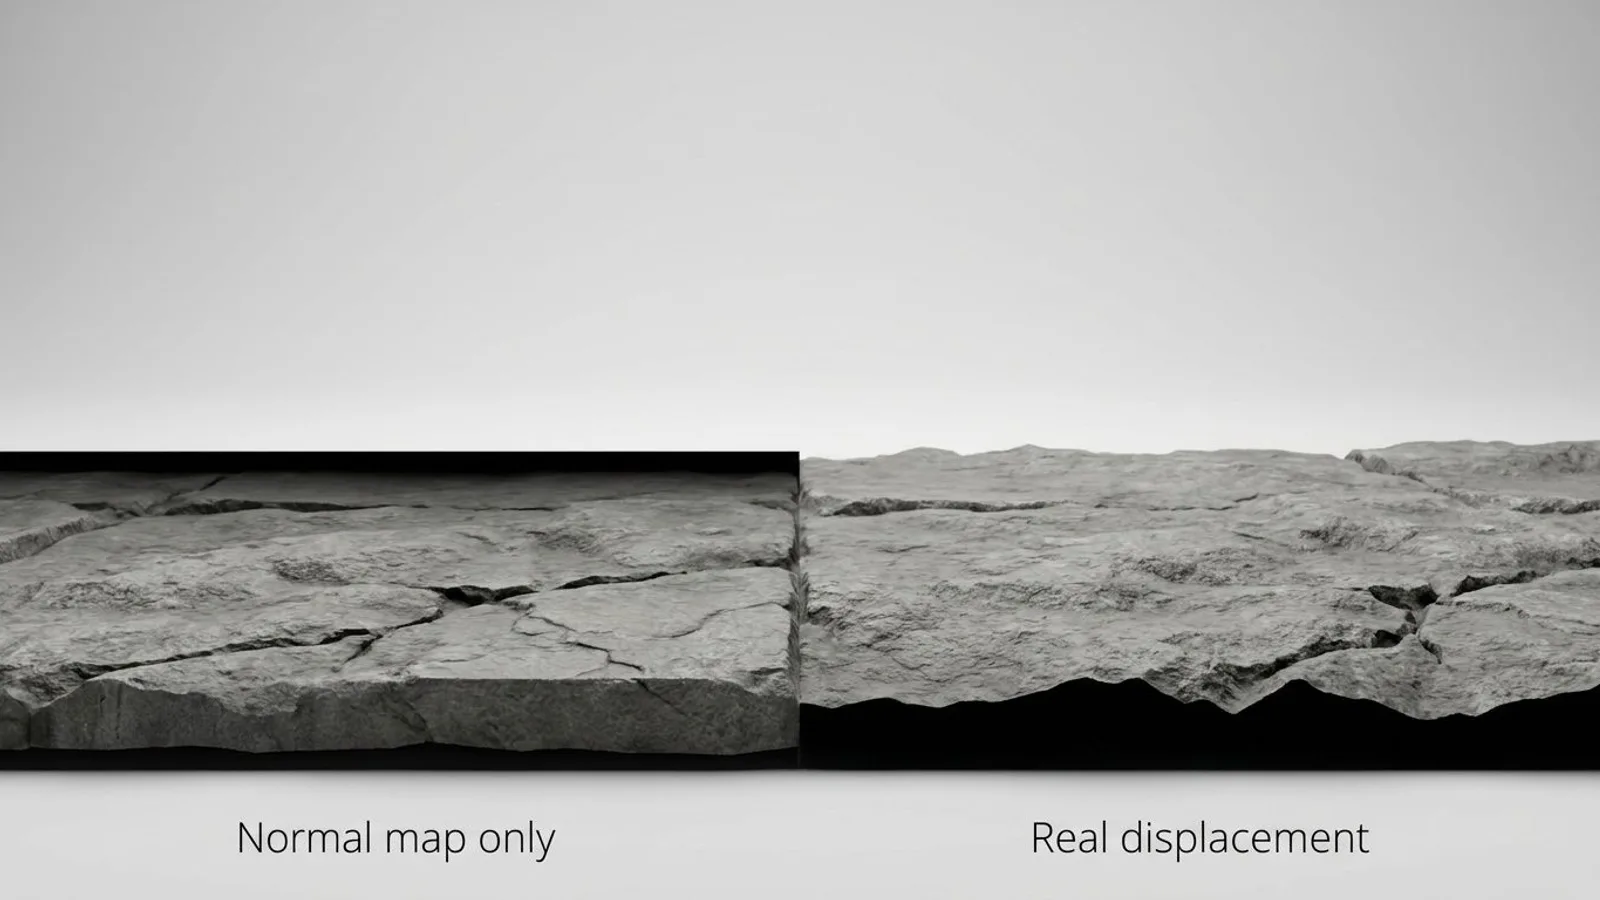
Used as a bump map, that same height information only nudges the lighting calculation, without moving anything on the mesh. The silhouette at the edge of an object stays exactly the same, no matter how deep the grout lines in the texture look.
Parallax occlusion mapping goes a step further while staying within the same principle: instead of only bending the lighting, it shifts which part of the texture gets shown per pixel, depending on the viewing angle. Godot's own documentation describes this well for the Height setting on its standard material, calling it a "ray-marched search" that emulates recessed detail along the view direction — explicitly an optical illusion of depth, without creating real geometry. From a distance or along straight edges, that illusion holds up. Right at the silhouette edge, the difference from real geometry becomes obvious.
Only a true displacement map actually moves vertex positions in space. Only here does an object's silhouette visibly change, because real new highs and lows get created instead of merely simulated.
For our own Farming Simulator 25 texture packs, that has a practical consequence: the _disp file is part of the download, but not part of the DDS conversion for the GIANTS Editor. There, we currently only convert diffuse, normal, and specular maps. The displacement map is meant for use outside the game instead, for example in preview renders in Blender or in other engines with their own support for real geometry displacement.
Real displacement needs geometry
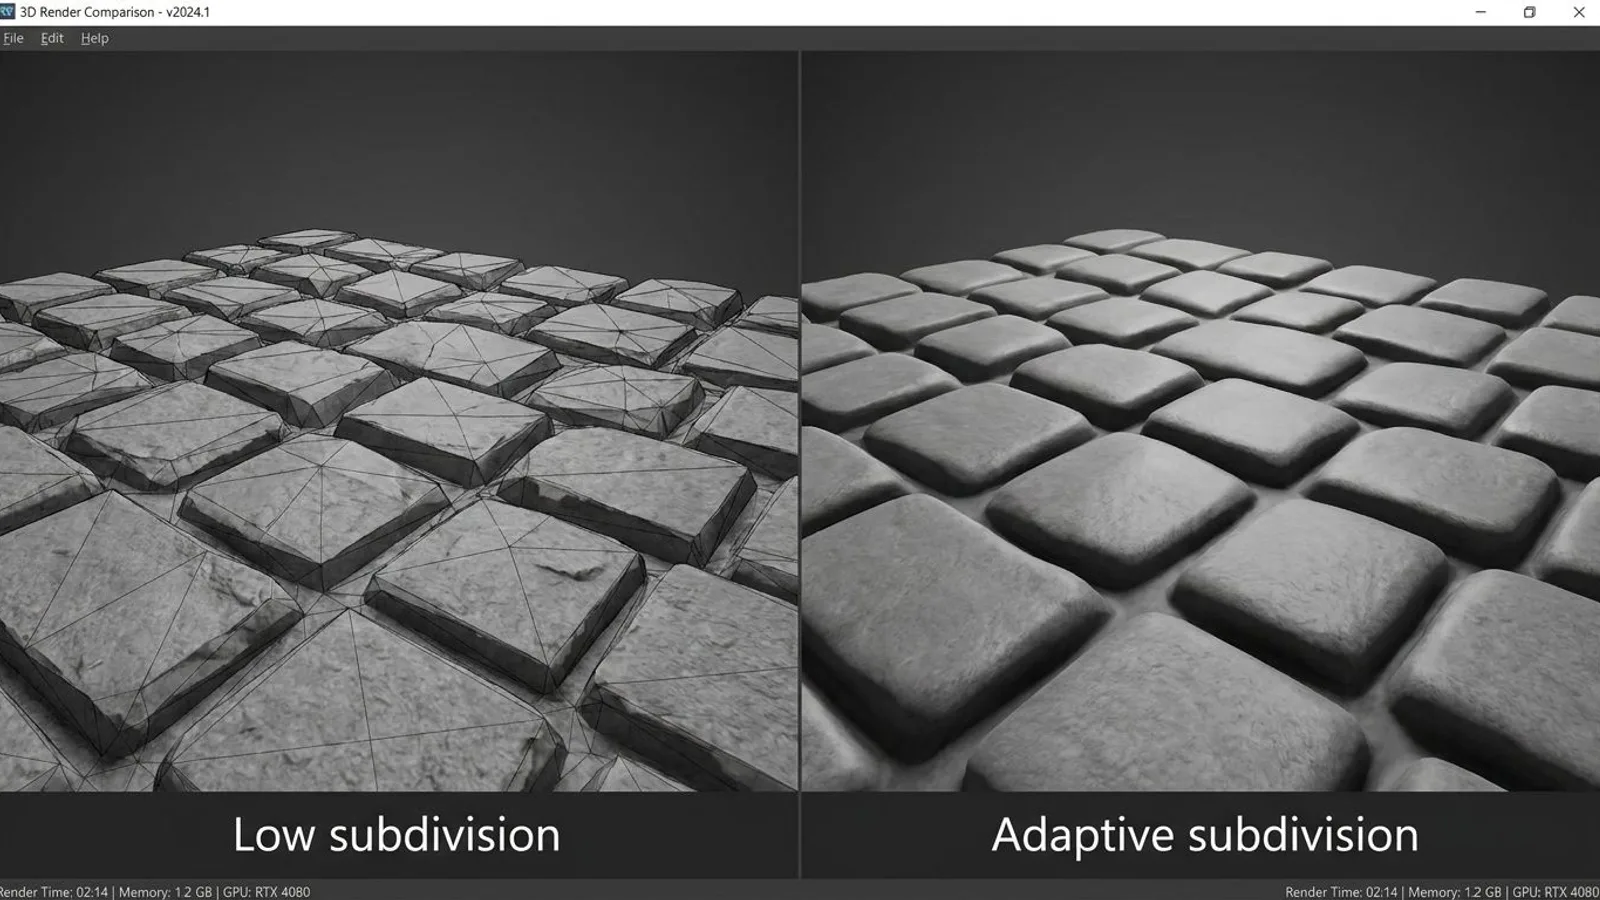
That's exactly where real displacement runs into trouble: a vertex can only move to a position that already exists. A flat quad made of two triangles can't turn into detailed cobblestone paving no matter how fine the height map is, because the points that would need to move simply aren't there. Without enough mesh subdivision, a displacement map ends up looking coarse, blocky, or like a cluster of individual facets instead of an organic surface.
 AI-generated
In Blender's Cycles renderer, adaptive subdivision solves this by subdividing the mesh only at render time, based on distance from the camera — surfaces close to the camera get more triangles, distant ones stay coarse. Up through Blender 4.x, this sat behind the experimental feature set; since Blender 5.0, Blender's own documentation no longer marks it experimental, and it's available by default in the Subdivision Surface modifier.
Why 16 bit instead of 8 bit avoids stepping
A height map with only 8 bits per channel has 256 possible gray levels. Across a smooth wall or a gentle height gradient spanning an entire texture tile, that's often not enough to render the transition truly smoothly — neighboring height values jump in visible, stair-like steps instead of rising evenly. A 16-bit channel, with 65,536 possible values, has far more room for fine gradients. That's exactly why we ship our own _disp files as 16-bit PNG rather than 8-bit JPG.
Midlevel and strength: why both values matter together
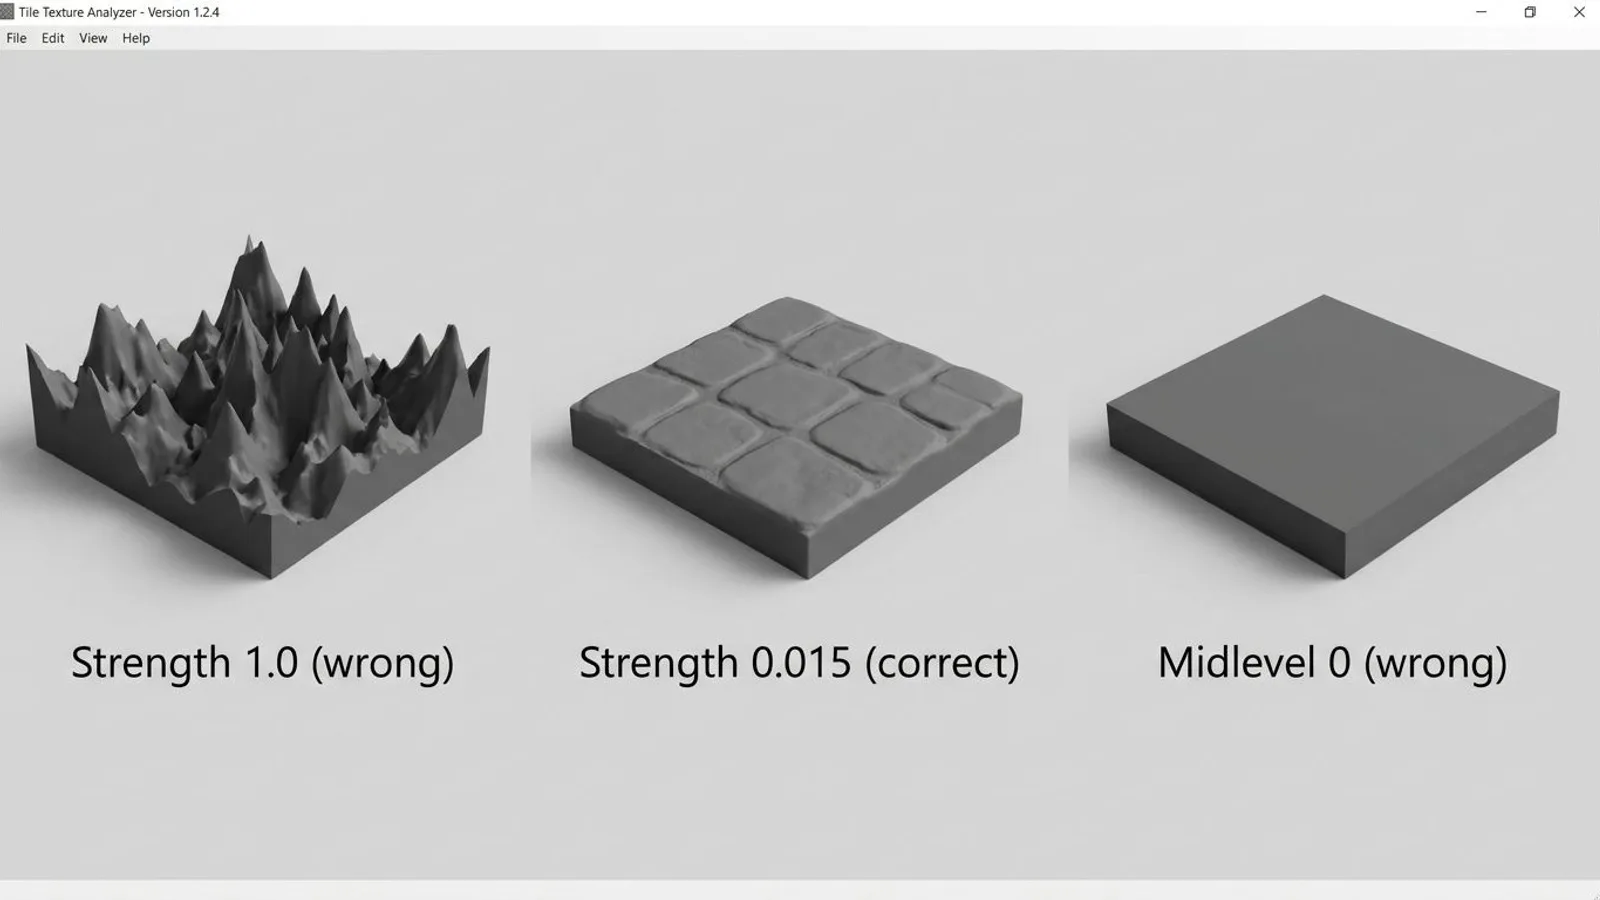
A displacement map needs a reference point beyond its raw height values: the so-called midlevel. It defines which gray value counts as a neutral surface with no displacement at all. Blender's Displacement node sets this to 0.5 by default: anything above pushes the surface outward, anything below pushes it inward. Set the midlevel to 0 instead, and the entire surface shifts outward uniformly, because practically every gray value in the texture sits above that zero point — a common mistake that looks like a badly scaled texture but is really a midlevel problem.
The second value is strength, usually given in the scene's base unit, meters in Blender by default. This is where a lot of beginners trip up: a height map for a wall texture with realistic grout lines only a few millimeters deep needs a tiny strength value, something like 0.005 to 0.02 meters, not the default of 1 that's often left untouched. Leave the strength at that default, and the wall ends up looking like it's erupting meters out of itself.
One of our own products makes this concrete: our "Cobblestone 01" tile is built for a real-world edge length of 1.5 meters. The grout between individual paving stones is realistically a centimeter or two deep, not several decimeters. Try a displacement strength of 0.015 instead of 1 in Blender, and the relief matches the real grout depth instead of looking like a concrete mountain range. The midlevel stays at 0.5 the whole time; only the strength gets adjusted to the tile's real size.
 AI-generated
How engines actually use displacement
The three engines from our link matrix each handle this differently, and none of them behaves quite like the others.
In Blender with Cycles, real displacement is available directly in the Shader Editor through the Displacement node and combines with the adaptive subdivision mentioned above to produce genuinely moved geometry at render time.
In Godot, the Height setting on the standard material (StandardMaterial3D, and ORMMaterial3D for our ORM-packed textures) explicitly does not move real geometry. Per Godot's documentation, it only produces a visual depth effect through a parallax-style search along the view direction; for an actually physical height shape, for example for collision, the documentation points instead to a separate shape called HeightMapShape3D. For a tileable wall or floor texture, the Height setting is usually enough in Godot, since you rarely view a surface at an angle flat enough for the missing silhouette effect to matter.
In Unreal Engine, real runtime displacement is possible through what's called Nanite tessellation: it subdivides a Nanite mesh at runtime based on a displacement map or a procedural material, rather than locking in subdivision ahead of time at export like Blender does. According to Epic's own documentation, this feature is currently marked experimental and only applies to Nanite-enabled meshes, not classic meshes without Nanite. Anyone working with older, non-Nanite meshes in Unreal Engine still relies on parallax occlusion mapping or on geometry that's already subdivided in the source 3D application.
How to set up displacement through the material channels in Cinema 4D is covered in our separate Cinema 4D guide. For an overview of every PBR map type, including when displacement is actually worth using, see our PBR textures overview.
When real displacement is actually worth it
Real geometry displacement costs render time, since extra vertices have to be calculated and moved, and it doesn't pay off equally for every surface. For shallow texture like fine plaster or lightly textured paint, a normal map is almost always enough in practice, because the viewing angle is rarely shallow enough for the missing silhouette effect to register. For coarse structure with deep grout lines, such as paving stones, cracked concrete, or corrugated metal with a visible edge, real displacement makes a noticeably bigger difference, especially in close-ups or when the camera skims low across the surface and the silhouette at the edge becomes visible.
 AI-generated
A quick reality check before you commit
Before dropping a displacement map into a project, it's worth a short reality check: how deep is the structure really, how close does the camera get to the surface in the finished project, and does the target engine even support real displacement or only a parallax approximation? The answers to those three questions usually settle whether the extra work of subdividing and testing pays off, or whether a simpler normal map gets you the same impression for less effort.
Common problems
| Problem | Cause | Fix |
|---|---|---|
| Visible stair-stepping instead of a smooth relief | Mesh isn't subdivided enough for the strength setting used | Increase subdivision or enable adaptive subdivision, or reduce the strength |
| Cracks or jumps right at UV seams | Height values jump across the seam because both sides don't share a smooth, continuous gradient | Place UV seams along edges where the real height difference is small anyway |
| The whole surface shifts uniformly instead of just showing relief | Wrong midlevel, e.g. 0 instead of 0.5 | Set midlevel to 0.5 and adjust only the strength |
| Result looks absurdly exaggerated or caved in | Strength was set in the wrong unit, e.g. 1.0 instead of 0.01 for a few millimeters of relief | Match the strength to the structure's real physical depth |
Frequently asked questions
What is the difference between a height map and a displacement map?
A height map is initially just a grayscale image carrying elevation data. Whether it becomes a bump map, a parallax map, or a true displacement map depends entirely on the technique that uses it. Only real displacement actually moves geometry.
Isn't a bump map good enough?
For very fine texture, often yes, since it costs far less rendering time. But once an object's silhouette needs to visibly change at the edge, for example with deep grout lines or chunky stones, a pure lighting trick stops being convincing.
Why do you ship displacement maps as 16-bit PNG?
An 8-bit channel only has 256 possible steps, while a 16-bit channel has 65,536. On smooth height gradients, that noticeably reduces visible stepping in the relief, especially on larger texture tiles.
What does the midlevel value do in displacement?
Midlevel defines which gray value counts as a neutral, undisplaced surface, usually 0.5. Values above it push the surface outward, values below it push it inward. Get the midlevel wrong, and the whole surface shifts uniformly instead of just showing the relief.
Does Unreal Engine support real displacement with Nanite?
Yes, with a caveat: Nanite tessellation can subdivide a Nanite mesh at runtime based on a displacement map. Epic's own documentation marks this feature as experimental.