SketchUp Textures: Setting Up PBR Materials in the Materials Panel
Since SketchUp 2025, the Materials panel has dedicated fields for Metalness, Roughness, Normal, and Ambient Occlusion maps; earlier versions only display a material's color texture.
- Version
- SketchUp 2026 (current) – native PBR maps since SketchUp 2025
- You need
- SketchUp 2025 or newer for Metalness/Roughness/Normal/AO
- PBR maps
- Metalness, Roughness, Normal, Ambient Occlusion – each its own file
- Time
- 15 minutes
SketchUp is popular with architects and hobbyist modelers because it gets you from sketch to textured model fast. For tileable PBR textures like ours, that came with one catch for a long time: SketchUp only displayed a single color texture per material, with nothing reacting to light. That changed with SketchUp 2025. Since then, the Materials panel has had dedicated fields for Metalness, Roughness, Normal, and Ambient Occlusion, and the current SketchUp 2026 builds directly on that.
This guide walks through setting up a texture like our Cobblestone 01 in the Materials panel, assigning its PBR maps, and dialing in the tile size to the texture's real 1.5-meter measurement.
The Materials panel: Select and Edit
Open the Materials panel via Window > Materials (on macOS it's called Colors), or activate the Paint Bucket tool. It has two tabs. The Select tab is where you browse existing material libraries and create new materials. The Edit tab is where you adjust color, texture, opacity, and, for materials with texture maps, the Photoreal properties of a material already applied in the model. The Edit tab only becomes available once the material has been applied to at least one face and appears under the In Model collection.
Step 1: Create the material
On the Select tab, click Create New Material. The Create Material dialog opens; give it a name, enable Use Texture Image, and pick our diffuse file, for example FSMW_cobblestone_01_diff_4k.jpg. SketchUp creates a new material from that and adds it to the In Model collection.
Step 2: Paint the face and set the tile size
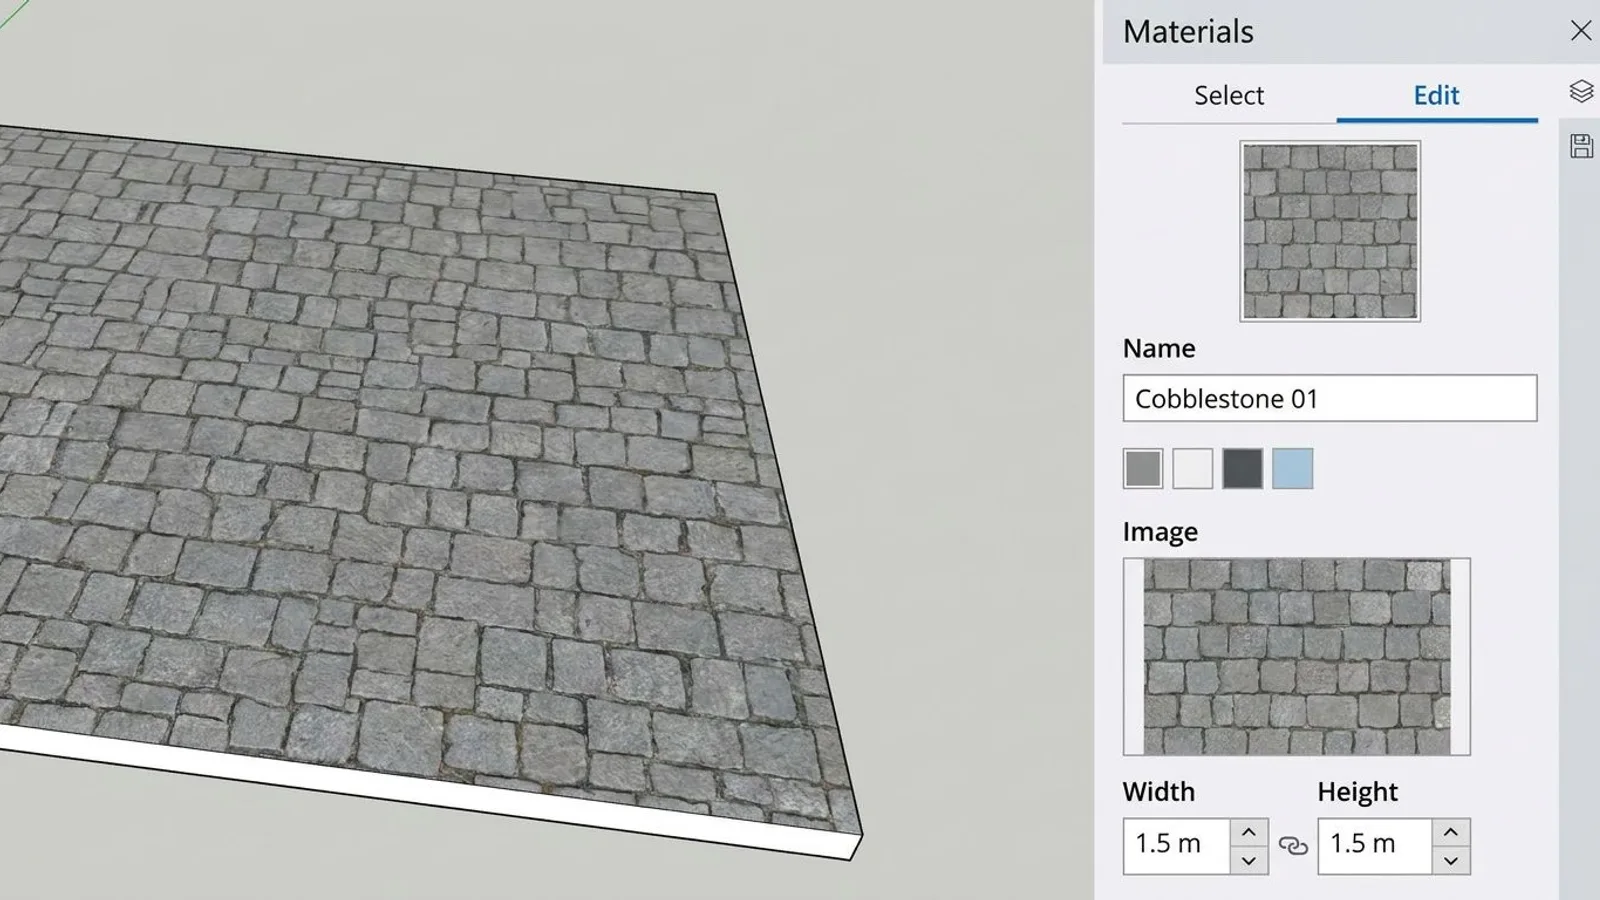
Apply the new material to a face with the Paint Bucket tool. Then switch to the Edit tab. Under the image options you'll find two fields for the size of the texture tile. Type a value into one of them and SketchUp automatically preserves the image's aspect ratio; if you want to deliberately distort the image, click the chain icon first to unlock the ratio. For Cobblestone 01 you'd enter 1.5 m here, for Oak Planks 01 it would be 1.2 m, and for Rusty Corrugated Metal 01, 0.988 m. That keeps the texture's scale matching the real object in the model instead of stretching it arbitrarily.
 AI-generated
If you want to edit a texture file afterward in an external program, say to crop it, set an image editor like Photoshop or GIMP under Preferences > Applications. Clicking the image in the Edit tab then opens the file there directly, and SketchUp picks up the saved changes automatically.
PBR maps: what SketchUp has done since 2025
Before SketchUp 2025, a material was essentially just its color texture. Light and shadow came from scene lighting, but the surface itself didn't react differently to metal, roughness, or fine surface detail. Anyone who wanted more needed a rendering extension like V-Ray for SketchUp, or a plugin from the Extension Warehouse that baked its own PBR maps into a custom material.
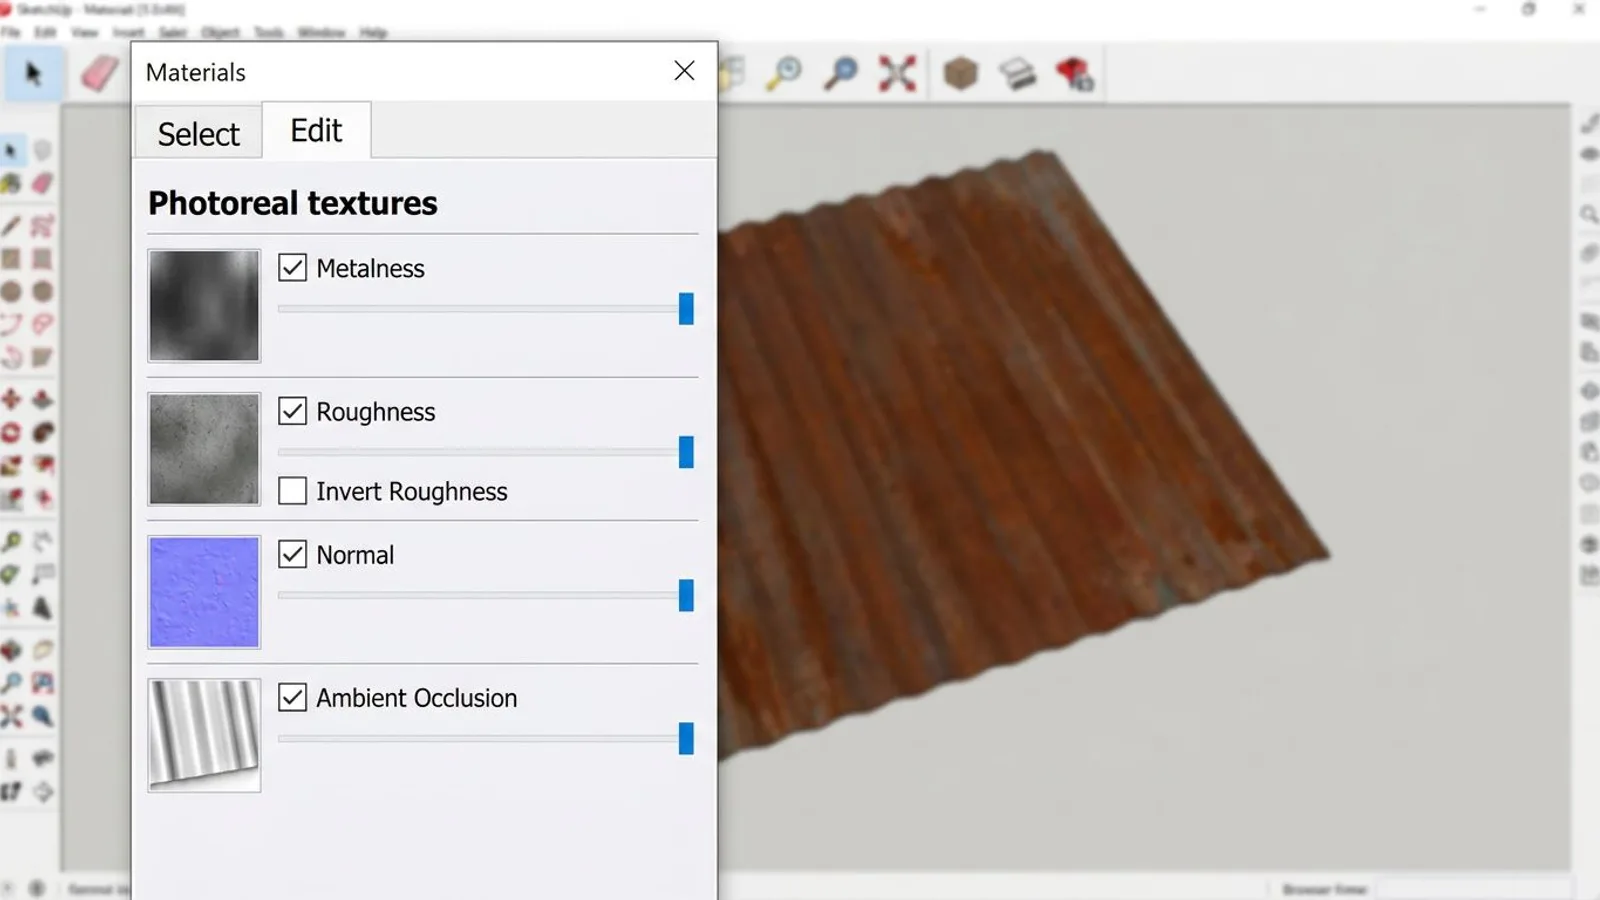
SketchUp 2025 added the Photoreal Materials display, and it's now a standard part of the Edit tab in the current 2026 release. As soon as a material carries one of the following maps, extra sliders appear in the Edit tab:
- Metalness – determines how metallic the surface's reflections look.
- Roughness – determines how smooth or rough the reflection appears; checking Invert Roughness flips the interpretation if a map was authored the other way around, as a glossiness map.
- Normal – simulates fine surface geometry without changing the actual geometry.
- Ambient Occlusion – darkens edges and tight spaces; per SketchUp's own documentation, this one requires a dedicated texture map.
Our _rough file is already a standard roughness map (bright = rough), so you don't need Invert Roughness. Important: SketchUp wants a separate image file for each of these four properties. A packed ARM texture, which we also ship (red = AO, green = roughness, blue = metallic), can't be loaded in one go. To use the metalness channel from the ARM package, you'd isolate the blue channel in Photoshop, GIMP, or another editor and save it as its own grayscale image; the same applies to the red channel for ambient occlusion. It's simpler to just use the separate _rough, _ao, and _nor_gl files included in every one of our downloads.
Our _disp displacement map has no home in SketchUp's Photoreal Materials: the official documentation lists only four slots, Metalness, Roughness, Normal, and Ambient Occlusion, with no height map for actual geometry displacement among them. That's fine for our purposes, since the normal map already carries the visual sense of depth.
SketchUp's official help pages don't specify whether the Normal slot expects the OpenGL or DirectX channel convention. There is, however, a dedicated switch for it in the Edit tab: a small square icon sits next to the normal texture and toggles between the two conventions. For OpenGL normal maps like our _nor_gl files, the practical rule is: turn the icon on (it then shows in teal). Because the official help does not pin this down, check it against the result: edges and joints should catch the light the way they look in the texture photo. If the surface still looks caved in rather than raised after assigning the map, check that switch first before inverting the normal map's green channel in an image editor.
Step 3: Assign the Photoreal maps
In the Edit tab, click the image field next to Metalness, Roughness, Normal, and Ambient Occlusion in turn, and pick the matching file from our download package. The sliders next to each one control how strongly that map affects the material; you can generally leave them at 100% since our maps are already fully baked.
 AI-generated
For any of this to actually show, two things need to be in place. First, the active style needs to use the Photoreal Materials face style — not every style does that by default. Second, the scene needs an environment loaded from the Environments panel, because metalness and roughness react to reflected environment light. Without an environment, the maps are loaded but you'll barely see a difference from a plain color texture.
For more on how the different map types work together and how they're described systematically, see our introduction to PBR textures.
A word on Generate Textures: the small AI button in the lower right of the material preview in the Edit tab lets SketchUp automatically generate missing PBR maps for a material. You don't need it for our textures — the maps already come finished in the download, measured against the actual texture rather than guessed by an algorithm. That button is mainly meant for materials that only arrive with a color texture, for instance from 3D Warehouse.
Positioning a texture: the Texture Position tool
The tile size field in the Edit tab covers most cases. If you also want to rotate, shift, or align a texture to a specific edge, SketchUp has a dedicated tool for that.
Step 4: Align the tile
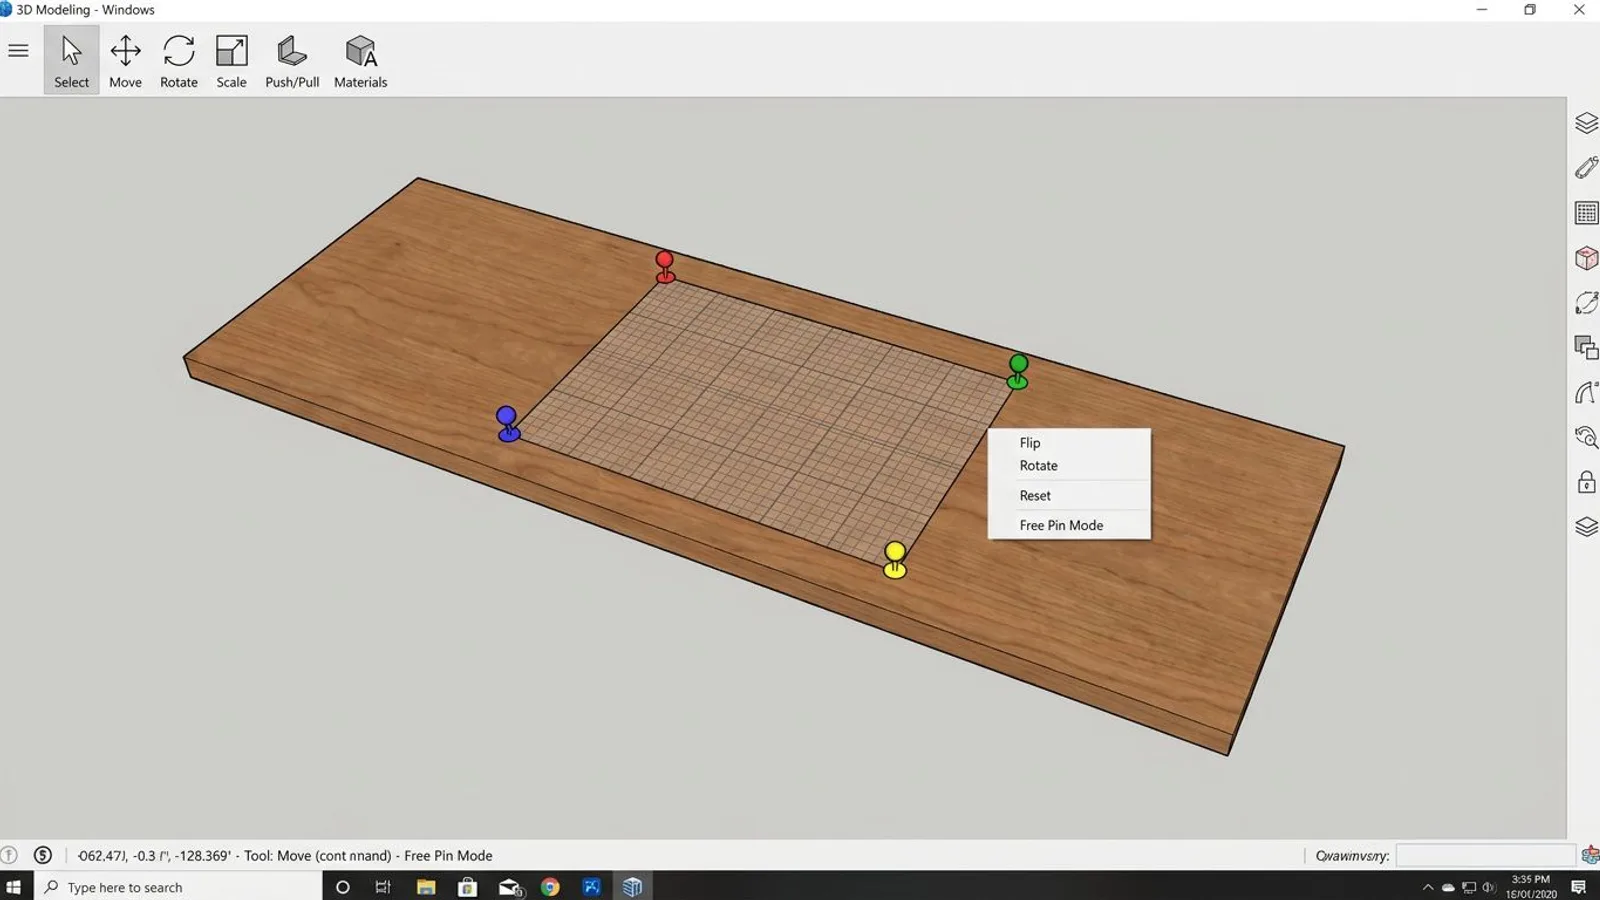
Right-click the textured face, then choose Texture > Position. SketchUp overlays the texture with a grid and four colored pins:
- The green pin scales and rotates the texture at once — the one you'll reach for most often to fine-tune size and orientation.
- The red pin moves the texture.
- The blue pin scales and shears.
- The yellow pin distorts the texture freely.
Right-clicking the grid opens further options like flipping, rotating in 90° steps, or resetting. Free Pin Mode turns the pins white and lets you drag them to any of the texture's four corners — useful when you need to fit an image precisely onto an existing shape in the model, like matching a window texture to a facade opening. Click anywhere outside the grid to finish.
 AI-generated
Common problems
| Problem | Cause | Fix |
|---|---|---|
| Photoreal maps loaded but no visible effect | Style isn't using the Photoreal Materials face style, or no environment is set | Choose a style with the Photoreal Materials face style and enable an environment in the Environments panel |
| Metalness or AO field won't accept the file | Tried to load the packed ARM file directly | Extract the blue or red channel of the ARM texture into its own grayscale file first, or just use _rough/_ao |
| Normal map looks caved in instead of raised | The square convention icon next to the normal map is set to the wrong option | Toggle the icon to OpenGL (shown in teal); if that doesn't help, invert the normal map's green channel in an image editor |
| Texture looks stretched or squashed | Aspect ratio got unlocked while entering the tile size | Re-enable the chain icon in the image options and re-enter the value |
| Edit tab's Photoreal options are missing entirely | Material hasn't been applied to a face in the model yet, or SketchUp predates 2025 | Apply the material with the Paint Bucket first; update to SketchUp 2025 or newer for PBR maps |
For how to work out the right tile size for different textures in the first place, see our texel density guide; for how to prepare a texture so it repeats cleanly across larger surfaces, see our tileable textures guide.
Frequently asked questions
From which SketchUp version do PBR textures work?
From SketchUp 2025 onward. Photoreal Materials with Metalness, Roughness, Normal, and Ambient Occlusion maps were added in that release; the current version is SketchUp 2026. Older versions only show a material's color texture, without light or environment reacting to it.
Can I load a packed ARM texture directly into SketchUp?
No. SketchUp expects a separate image file for each of Metalness, Roughness, Normal, and Ambient Occlusion. A packed file like our ARM texture (red = AO, green = roughness, blue = metallic) has to be split into individual channels in an image editor first.
How do I set a texture's real-world tile size?
In the Materials panel's Edit tab, enter the tile's width or height in the image options, for example 1.5 m for Cobblestone 01. SketchUp automatically preserves the image's aspect ratio while you do this.
Why does my PBR texture still look flat in the model?
Photoreal Materials only react visibly to light when the active style uses the Photoreal Materials face style and an environment is loaded from the Environments panel. Without an environment, there's no reflection for metalness and roughness to respond to.
How do I rotate or rescale a texture after placing it?
Right-click the textured face and choose Texture > Position. In the grid, drag the green pin to scale and rotate, the red pin to move, the blue pin to scale and shear, and the yellow pin to distort.